
Comm100 allows you to respond to messages sent by your customers through integration with the WhatsApp Business account. You must first set up your business assets on the WhatsApp Business Platform before you can configure and start using WhatsApp Cloud API from Comm100.
- Create App on Meta for Developers
- Associate a Business Manager Account
- Generate a Permanent Token
- Set Up a Webhook
To create an app, follow these steps:
- Register as a Meta Developer.
- (Optional): Enable two-factor authentication for your account.
- Go to developers.facebook.com > Apps > Create App.
- On the Select an app type page, choose an app type as Business. Your app type determines which products and APIs are available to your app.
- Click Next.
- In the Display Name field, enter the name of your app.
- In the App Contact Email field, enter an email address where Meta can send you any important developer notifications.
- Select or create a WhatsApp Business Manager account from the drop-down list.
- Click Create App.
Once completed, your app is loaded in the App Dashboard.


 Once completed, your app is loaded in the App Dashboard.
In this step, you associate a Business Manager account with WhatsApp. To associate a Business Manager account with WhatsApp, follow these steps:
- On the developers.facebook.com, go to the App Dashboard page and select your app from the drop-down list.
- Click Add Products.
- Scroll down to find the WhatsApp product and click Set up.
- On WhatsApp’s Getting Started page, scroll down to step #5 to add your phone number.
- Click Add phone number.
The Create a WhatsApp Business profile pop-up appears. - Provide your WhatsApp Business profile display name, Time zone, and Category.Note: Your profile information will be visible to people on WhatsApp.
- Click Next.
- Add a valid phone number for your WhatsApp.
- Select a verification option – Text message or Phone call, and click Next.
A One Time Password verification process takes place. - On successful verification, the phone number appears in the From drop-down list of Step #1: Select phone number.
- Locate the Phone number ID for your WhatsApp phone number. Copy and save the Phone number ID locally and proceed to Step 3: Generate a Permanent Token.


To generate a permanent token, follow these steps:
- Go to business.facebook.com and click the hamburger menu > All tools > Business settings.
- On the Business settings page, navigate to Users > System users and click Add to create a system user.Note: Creating a system user is an optional step. If you already have one, you do not have to create it. Else, you must create it.
- Create a System Username and select System User Role as Admin.
- Click Create System User.
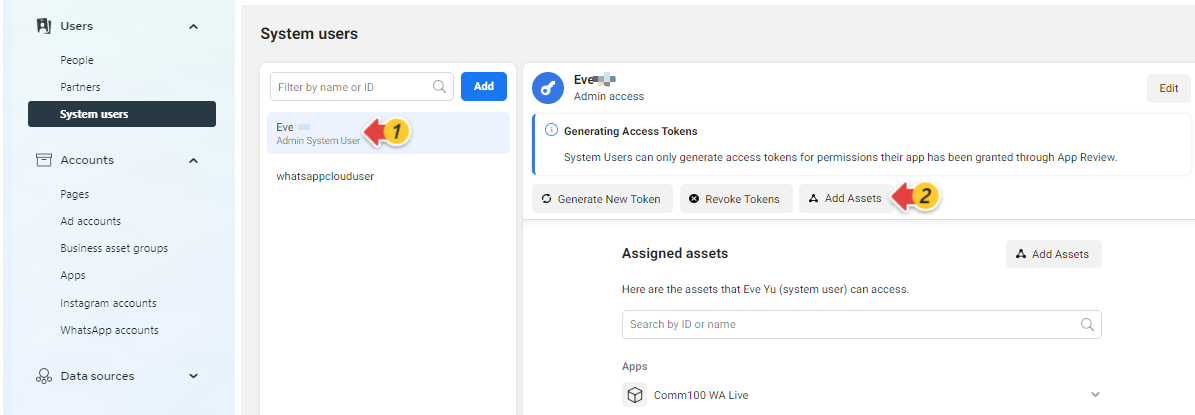
The system admin user appears on the list. - Select the system admin user and click Add Assets.
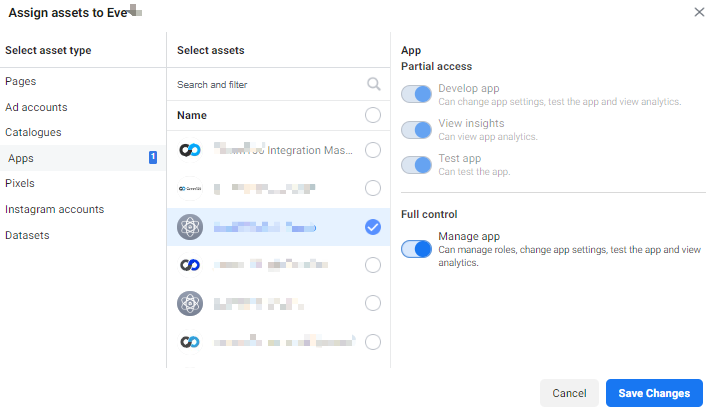
- Check the App you created on the Step 1 and click Save Changes.
- For the same system admin user, click Generate New Token.
- Select an app from the drop-down list you created in Step 1: Create App on Meta for Developers.
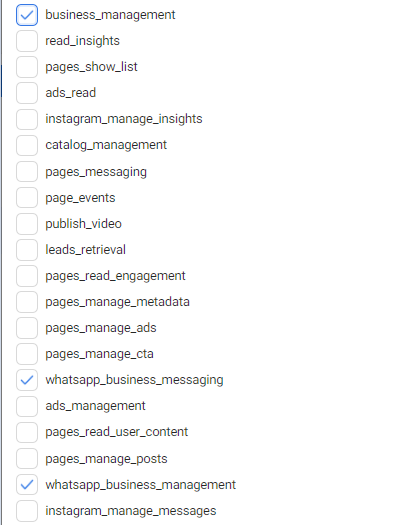
- From the Available permissions section, select business_management, whatsapp_business_messaging and whatsapp_business_management.
- Click Generate Token.
- An Access Token (Token) is generated. Copy and save the access token locally and click OK.
- Next, go to Comm100 Control Panel: Ticketing & Messaging > Channels > WhatsApp, and do the following:
- Provide the Phone ID and Token you saved locally in the WhatsApp channel account.
- Copy the Callback URL and Verify token from the Comm100’s WhatsApp channel account and proceed to Step 4: Set Up a Webhook.






Webhooks are user-defined HTTP callbacks that are triggered by specific events. You get a notification (HTTP request) sent to a setup URL whenever a trigger event occurs.
To set up your Webhook, follow these steps:
- Go to developer.facebook.com and select the app from the drop-down list you created in Step1: Create App on Meta for Developers.
- Navigate to Products > WhatsApp > Configuration.
- Click Edit.
- On the Edit webhook’s callback URL pop-up, provide the Callback URL and Verify token you saved locally from the Comm100 Control Panel: WhatsApp channel account.
- Click Verify and save.
On successfully configuring the Webhook settings, the Manage button is enabled. - Click Manage and subscribe to the Webhook fields. You need to subscribe messages and message_template_status_update fields.
- Next, go to the Comm100 Control Panel and click Save & Test to test your WhatsApp channel connection with Comm100 Ticketing & Messaging.


To learn more on WhatsApp channel configuration on Comm100 Control Panel, see this article.